| | The Wildcat build |  |
|
|
|
| Author | Message |
|---|
paul
@dubdrift.com


Posts : 1462
Join date : 2009-10-26
Location : Dubai
 | | Subject: The Wildcat build Tue Feb 08, 2011 1:33 am | |
| | |
|
 | |
cathurga
Lead Driver

Posts : 1733
Join date : 2009-06-24
Location : Dubai
| | Subject: Re: The Wildcat build Tue Feb 08, 2011 1:58 am | |
| Starting to take shape...! Nice At least the chassis wasn't too butchered to redo the suspension, if I recall all the parts were there to change it back. What did the guy on the build that you are following use to get the length right? If you want to rally it, you will want to remove the 55T lathe motor  that thing wont get you anywhere.. | |
|
| | |
paul
@dubdrift.com
Posts : 1462
Join date : 2009-10-26
Location : Dubai
| | Subject: Re: The Wildcat build Tue Feb 08, 2011 11:31 am | |
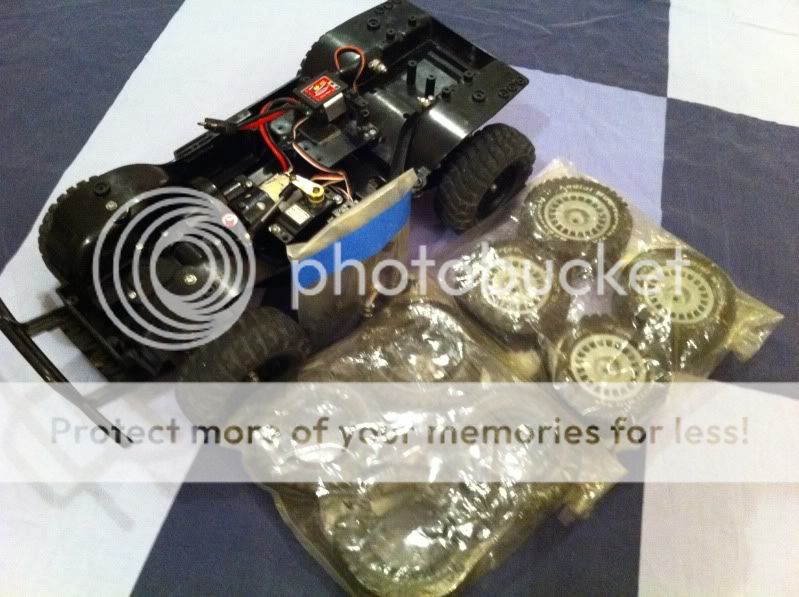
| yip the 55t is long gone as too is the bravo esc, i have a nice reedy 17t brushed motor and esc left over from my sc10 when i upgraded it to brushless, so that should do the trick quite nicely  if thats too much i may just drop a black can in there. the other build doesnt mention what he did to correct the wheelbase, but from the photos i can see he has made custom links for the rear suspension similar to the one below:  i was planning on doing the 4link upgrade anyway as the stock setup is rubbish! | |
|
| | |
cathurga
Lead Driver
Posts : 1733
Join date : 2009-06-24
Location : Dubai
| | Subject: Re: The Wildcat build Tue Feb 08, 2011 3:53 pm | |
| You could go spend some money at RC Channel.....they used to do a solid front axle upgrade... | |
|
| | |
paul
@dubdrift.com
Posts : 1462
Join date : 2009-10-26
Location : Dubai
| | Subject: Re: The Wildcat build Tue Feb 08, 2011 5:36 pm | |
| havent seen the front axle upgrade, they have some nice stuff there, I quite like the scale rear axle they have..... dont plan on spending much on this build want to try and do it with all the bits and pieces i have lying around....rather save the cash for something else  | |
|
| | |
paul
@dubdrift.com
Posts : 1462
Join date : 2009-10-26
Location : Dubai
| | Subject: Re: The Wildcat build Wed Feb 23, 2011 10:24 pm | |
| Okay making a little progress, body is sanded smooth and almost ready for some primer just need to glue the roof spoiler in place and then do a final sanding to get rid of any excess glue.   I've cut open the back section of the body for the spare wheels. 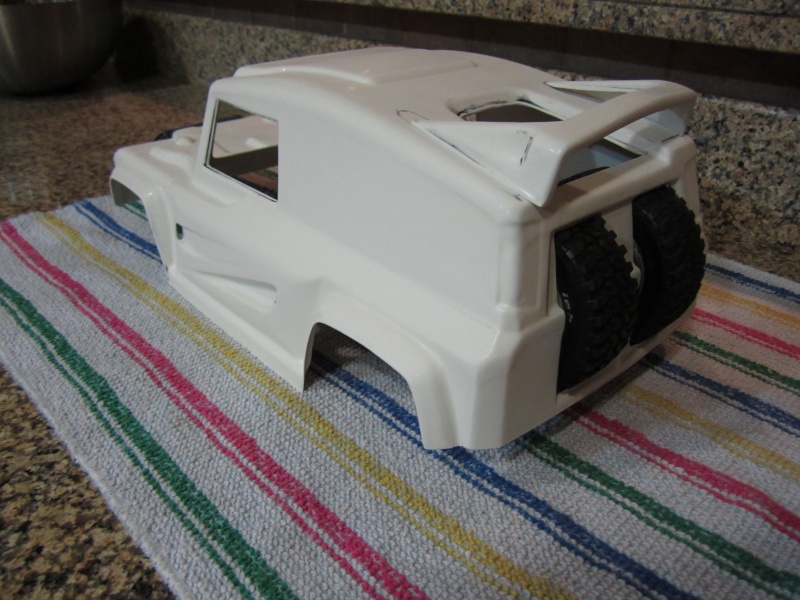 I have also cut off the front and rear bumper which were part of the body, I plan on making some custom bumpers out of some aluminium section. 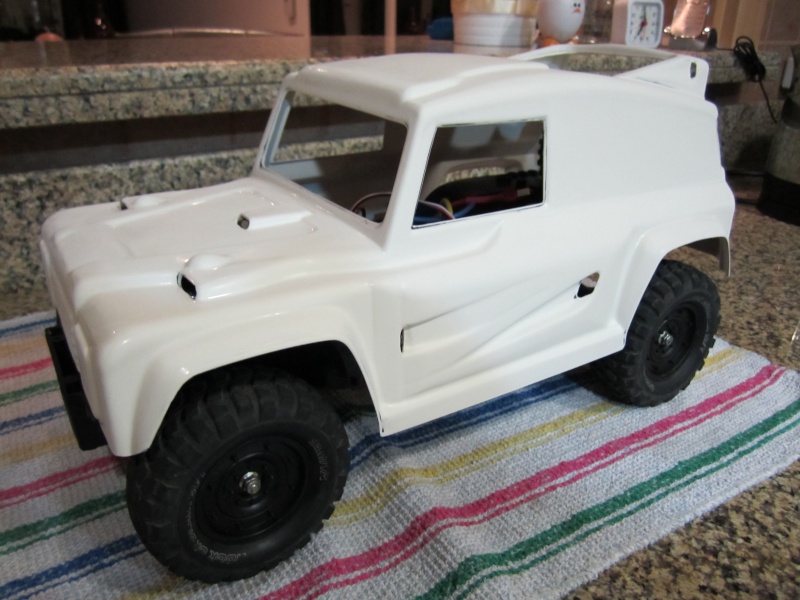 Hoping to get the primer on this weekend and the custom bumpers started, also need to trim the front of the chassis, to get a better fit for the body and get some better clearance up front. | |
|
| | |
Jay
Administrator

Posts : 2601
Join date : 2009-06-03
Location : Dubai Uae
| | Subject: Re: The Wildcat build Wed Feb 23, 2011 11:34 pm | |
| Your wildcat's having some real good progress there Paul.. good luck with your custom bumpers! Nice set of stock rims too | |
|
| | |
cathurga
Lead Driver
Posts : 1733
Join date : 2009-06-24
Location : Dubai
| | Subject: Re: The Wildcat build Thu Feb 24, 2011 12:02 am | |
| Looking good so far... Have you thought about what tires and wheels to put on it, or is that what you wanted the Accord wheels for? Is this going to be a rally raid car or a crawler? If you are going to rally it, I would recommend these from RC4WD... http://store.rc4wd.com/Desert-King-155-Offroad-Tires_p_214.htmlYou will need 1.55 wheels as well...these would be awesome... http://store.rc4wd.com/Stamped-Steel-155-Stock-White-Beadlock-Wheel-_p_36.htmlIt will be a LOT softer ride than that set of wheels and tires that are on there....those things have got NO give whatsoever.....on the trailfinder I had, it made all the difference to have softer tires and then make the softest suspension, lightest oil combo that you can... looks very scale, and drives nicer that way.... BTW, your goodies have arrived, didnt have time to collect today, but will get tomorrow morning. Let me know if you are interested in a bit of RC action on Friday...I might be out biking on Sat... | |
|
| | |
paul
@dubdrift.com
Posts : 1462
Join date : 2009-10-26
Location : Dubai
| | Subject: Re: The Wildcat build Thu Feb 24, 2011 12:36 pm | |
| @ Jay, thanks man, i like the wheels too, but will end up changing them as i'm trying to go for a scale look. @ Andy, yeah want to you the accord wheel as them seem pretty close to the stock bowler wheels, not sure about tires yet, the stock tamiya BF Goodrich tires are spot on as scale replicas, but are completely rubish in terms of performance......will need to do some research....let me know if you go out on friday, i should be able to come out for a while.  | |
|
| | |
Duane
Chase Driver

Posts : 568
Join date : 2009-06-25
Location : Dubai
| | Subject: Re: The Wildcat build Thu Feb 24, 2011 1:15 pm | |
| Hi Paul, I think I have the rims you are looking for I will dig them out tonight. Do you still have the 55 turn motor, I need one to slow my cc01 down.
Duane | |
|
| | |
cathurga
Lead Driver
Posts : 1733
Join date : 2009-06-24
Location : Dubai
| | Subject: Re: The Wildcat build Thu Feb 24, 2011 1:39 pm | |
| | |
|
| | |
cathurga
Lead Driver
Posts : 1733
Join date : 2009-06-24
Location : Dubai
| | Subject: Re: The Wildcat build Thu Feb 24, 2011 1:46 pm | |
| | |
|
| | |
paul
@dubdrift.com
Posts : 1462
Join date : 2009-10-26
Location : Dubai
| | Subject: Re: The Wildcat build Thu Feb 24, 2011 3:36 pm | |
| - Duane wrote:
- Hi Paul, I think I have the rims you are looking for I will dig them out tonight. Do you still have the 55 turn motor, I need one to slow my cc01 down.
Duane Duane, I still have the 55t but I'm planning on putting to use in a future scaler build, i happy to loan it to you until you mange to find/order/ship a new one. Let me know if you come right with the rims. - cathurga wrote:
- For scale tires, go for these then....
http://store.rc4wd.com/Dirt-Grabber-155-All-Terrain-Tires_p_658.html
again you will have to use the 1.55 wheels, but they are a lot more 'to scale' than the std tamiya stuff...
I hear you on the performande of the Tamiya BFG's, they might as well have made them out of concrete... the dirt grabers are sweet, there definately up there in terms of choices, i also like the mud thrashers but they are a too tall and i dont feel like hacking to tires to get them to fit. - cathurga wrote:
- ....oh, and dont forget a set of these....
http://store.rc4wd.com/The-Ultimate-Scale-Shocks-90mm-Silver-_p_1057.html i think those might fall into the shopping cart if i go for the dirt grabbers | |
|
| | |
strawb
@dubdrift.com

Posts : 1590
Join date : 2009-11-15
Location : Dubai
| | Subject: Re: The Wildcat build Fri Feb 25, 2011 1:21 pm | |
| progress is looking real good paul!!!! | |
|
| | |
sideslider
Chase Driver

Posts : 1052
Join date : 2009-07-04
Location : Dubai
| | Subject: Re: The Wildcat build Sat Feb 26, 2011 2:35 pm | |
| ive got the 1.9 dirt grabbers and they are as good as they look and perform, as for the scale shox, they didnt perform as well, too much of a bounce but they do look great | |
|
| | |
paul
@dubdrift.com
Posts : 1462
Join date : 2009-10-26
Location : Dubai
| | Subject: Re: The Wildcat build Sun Mar 06, 2011 12:04 am | |
| here goes another update! i have done a fair bit of work just havent been posting updates.....so here goes! i have taken a stab at making the front bumper out of some aluminium section, will need to still drill the holes and finish it up neatly. 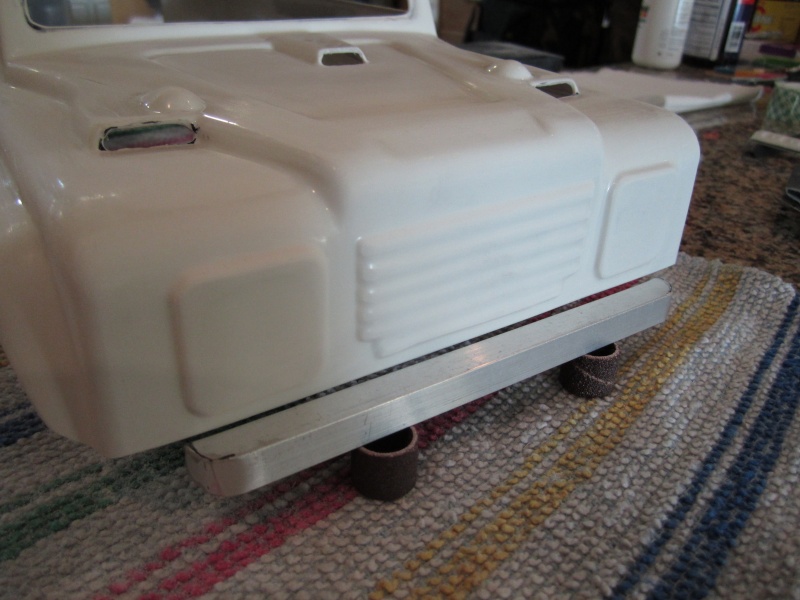 also have glued the rear spoiler in place with some epoxy, going to be difficult to smooth when it dries, but i guess thats why i have a dremel!  the next task on the list was to sort the front end of the chassis out, the cc-01 literally has brick up from which really messes with approach angles.....so i took the dremel to it and hacked it off!   also needed to do the hack to get the body further back on the chassis  then a quick test fit to see what it would look like  was going to use a tamiya touring driver cockpit for the wildcat, but courtesy of andy managed to get an old lancia drivers set! much better scale look! 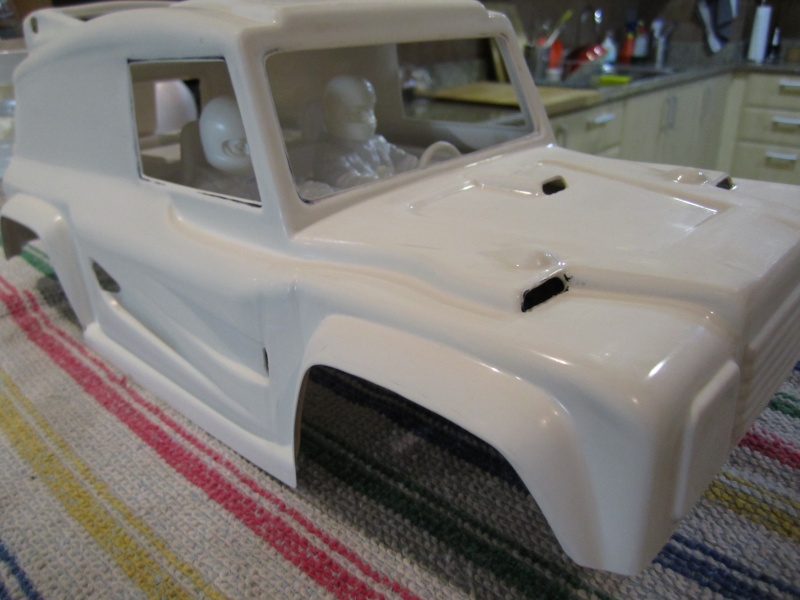 have also cut some poly carb sheet to make the windows - they still have a protective blue film on them - these will go in last  also did some last sanding and filling before putting the primer down
Last edited by paul on Sun Mar 06, 2011 12:51 am; edited 1 time in total | |
|
| | |
paul
@dubdrift.com
Posts : 1462
Join date : 2009-10-26
Location : Dubai
| | Subject: Re: The Wildcat build Sun Mar 06, 2011 12:15 am | |
| that post was getting a little long..... so to continue, got the the primer down, followed with some wet sanding to get the surface super smooth.   i have cut up the cockpit set to fit the bowler better and built a firewall at the back to separate the cockpit and the trunk  gave a cockpit the same treatment as the body, a coat of primer the followed by some matt black paint, i will paint in the rest of the detail by hand. will i had the black out i spraye dthe inside of the body in black too.  thats it for now, next up time to get some colour on the body, finish up the drivers and make the rear bumper....... | |
|
| | |
paul
@dubdrift.com
Posts : 1462
Join date : 2009-10-26
Location : Dubai
| | Subject: Re: The Wildcat build Tue Mar 08, 2011 1:40 am | |
| finally put down a few coat of colour and few coats of clear gloss, i think its finally starting to come together now   almost there with the body now, now just need to mask off and spray the detailed bit like wheelarch flares, roof spoiler, headlights and grill..... | |
|
| | |
Duane
Chase Driver
Posts : 568
Join date : 2009-06-25
Location : Dubai
| | Subject: Re: The Wildcat build Tue Mar 08, 2011 1:45 am | |
| Hi Paul,
Is the paint from a rattle can or did you buy an airbrush in the end ?
If its from a rattle can what make is it ?
The tyres look good, where did you find those ?
I rolled my Pajero yesterday, with the silver can its too fast an slide about 20 feet on its side. I really wish I had put down a initial coat of silver before the primer I would have a nice bare metal wear and tear effect now rather than white plastic showing through the road rash.
Duane.
| |
|
| | |
paul
@dubdrift.com
Posts : 1462
Join date : 2009-10-26
Location : Dubai
| | Subject: Re: The Wildcat build Tue Mar 08, 2011 12:42 pm | |
| Hey Duane, Long story here on the paint..... originally i was looking for a metallic burnt orange colour but with no luck (not sure why i'm still surpirised you cant find simple things like that out here.....normally back home you could walk in spares shop or hardware and have a range to choose from.....) .....so decided to go for the next best thing a nice high gloss orange.....anyway tried a few stores with no luck in finding any decent orange colour.....only stuff like pumpkin orange *$%*$* Long story short...... was at speedex for some other bits and decided to get a few cans of there 'el cheapo' 7dhs paints to test.... so picked up a yellow, orange and gold and went home and tested the colours out on some scraps.....the paints are very thinned out and a little translucent.....so i wondered how they would turned out sprayed in different orders... I wasnt expecting much from these spray cans, the spray nozzle are rubbish but I just used the nozzle off one of kylon sprays and it worked much better, the paint also takes much longer to cure properly, but in the end the paint dries hard and the finish was pretty good. eventually found a colour i liked, it ended up being 2 thin layers of gold, follow by 2 thin layers of yellow and then 3 thin coats of orange....follow by a few coats of a good quality high gloss i pickes up at ace.... The tyres i got with the chassis from andy, they are the ones that come off those tamiya high lift kits - i think they called "Tamiya Rock Cruiser" Bummer about the slide....You can always start again and respray with a silver base!  | |
|
| | |
cathurga
Lead Driver
Posts : 1733
Join date : 2009-06-24
Location : Dubai
| | Subject: Re: The Wildcat build Tue Mar 08, 2011 5:11 pm | |
| Tht looks alright the way it is,....
I am a long way from calling myself a decent painter, but one thing I have learned with rattle cans is to put the oven on to about 80 Deg C and as soon as you have finsihed a coat, shove it in. If you do really light coats, the heat helps to 'run' the paint while it is still wet, obviously you have to paint very light coats otherwise it runs off. It ensures a smooth surface. The flat them with some wet/dry paper. I also leave the paint to cure and 'gas' out for about 48 hours between coats. It is a long drawin out process but you gt the best finsih like this. The same goes for the gloss coat, the final clos I do a little thicker before going in the oven, it goes lirror smooth as it cures.....
Did you spray the colours over each other when wet still to get them undercoats to show through? | |
|
| | |
paul
@dubdrift.com
Posts : 1462
Join date : 2009-10-26
Location : Dubai
| | Subject: Re: The Wildcat build Tue Mar 08, 2011 5:44 pm | |
| yip spayed the 3 colours while it was still wet, luckly the paint was quite slow to dry so it gave me enough time to spray the various coats, i gave probably 2 min between coats and it worked fine. I then let air dry for about 10 min just let it dry slightly as it was looking quite wet, before getting the missus's hair drier with heat on high, blower on low to get the paint to run nicely, worked pretty well.....just had to make sure to keep the drier far enough away from the body not to start any runs...
(couldnt use the oven....as was told to keep the paint fumes outdoors blah blah blah...not in the kitchen blah blah blah...you want to do what in the oven blah blah blah.....)
after that i left it for the better part of 2 days to dry completely, followed by a wet sanding before appling the clear gloss coats
the base of gold is almost unnoticable in terms of colour but you do pick up a few metallic flecks, and the yellow really just brightens up the and gives it a nice glow.
gonna spray the wheel arch flares, roof spoilers, headlights and grill with some matt black tonight to finish it off.
| |
|
| | |
paul
@dubdrift.com
Posts : 1462
Join date : 2009-10-26
Location : Dubai
| |
| | |
jebjeb
@dubdrift.com

Posts : 1953
Join date : 2009-11-19
Location : Dubai
| | Subject: Re: The Wildcat build Wed Mar 09, 2011 1:14 pm | |
| wow! I am seeing a future shelf queen here  nice work Paul | |
|
| | |
sideslider
Chase Driver
Posts : 1052
Join date : 2009-07-04
Location : Dubai
| | Subject: Re: The Wildcat build Sat Mar 12, 2011 8:32 pm | |
| | |
|
| | |
Sponsored content
| | Subject: Re: The Wildcat build | |
| |
|
| | |
| | The Wildcat build | |
|

 Calendar